 Time Tracking & Productivity Blog
You run a business, and your business runs on time. Whether your need to bill your customers, or knowing which projects use up precious...
 Thomas Fuchs


freckle is more than just a little bit different, in all kinds of wonderful ways that you might not expect.
To get the most out of freckle, take just a few minutes to read our quickstart guide. What you’ll learn will save you time every day.

You input time into freckle with the The Quick Entry Box (QE box). It’s available on every page! It collapses out of the way when you don’t need it.
Opening the QE box. To reveal the QE box when it’s hidden, click its little tab:
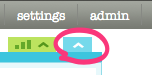
Closing the QE box. To close the QE box if it’s in the way, click the tab again.
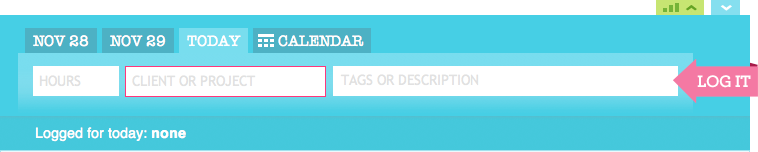
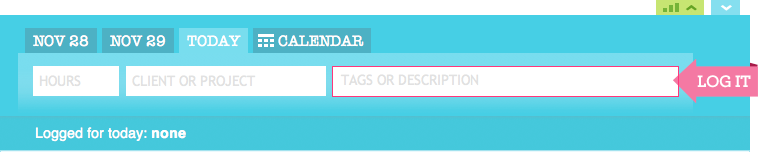
Entering time. Entering time in freckle has three elements, just like the 3 fields in the QE box:

The 3 elements of a time entry are:
| How long? How much time are you logging? | |
| Whom for? What’s the name of the client or project? | |
| Doing what. What do you want to say you were doing? |
The QE box is highly tuned for rapid entrythere are some tricks to entering exactly what you want as fast as you want. For one, all the fields are text fields, unlike any other time tracking system we’ve seen.
To learn how all the tricks to the QE box, keep reading!


The Time field offers the following smart formatting options. The list is in the format: Entered text → Freckle’s Understanding.
- 15 → 15 minutes
- 15m → 15 minutes
- 15h → 15 hours
- 13 → 15 minutes *
- 2 → 2 hours
- 6h → 6 hours
- 1d → 8 hours
As you can see, freckle makes intelligent guesses, but you can override them easily by adding m, h or d to your entry.
* Built-in rounding for your minimum billing increment! Default is the industry standard 15 minutes, but you can configure it on a per-project basis if you need to.

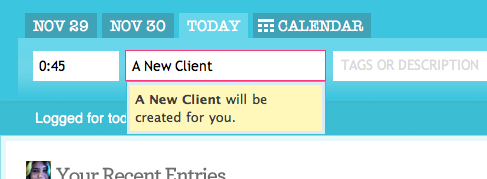
Once you’ve entered your time, tab on over to the Client or Project field (and freckle will interpret the time for you, as you’ll see).
The field’s Client or Project because you can enter whatever the heck you want.
Creating a new project/client/whatever. You don’t have to configure a client and then configure projects under that client. Just type a name! freckle will create it for you after you click Log It & you can use it going forward.
When you’ve built up a client/project/whatever or two, you can make use of the field’s handy dandy autocomplete:
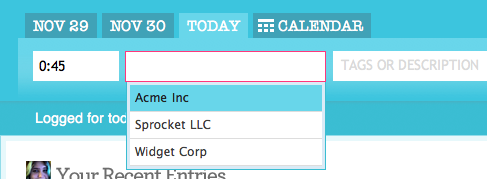
Autocompleting. Type the beginning of the name, or use your keyboard, or use your mouse, and hit <tab> to move to the next field!
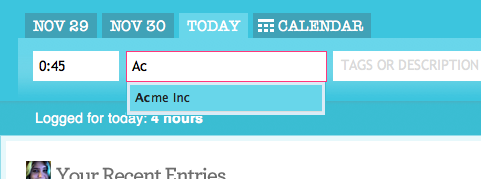
Once you really get the hang of itand depending on how lucky you are with your namesyou will be able to autocomplete your client/project/whatever names with just one letter and <tab>.

Finally, we come to the Tags & Description field. The T&D field takes tags, regular descriptive text, or both, or neither. It is entirely optional, however to get the most out of freckle, you’ll probably want to tag your entries.
Creating a new tag. To create a new tag, simply enter a phrase that is two words or fewer. To create more than one tag, separate them with commas:
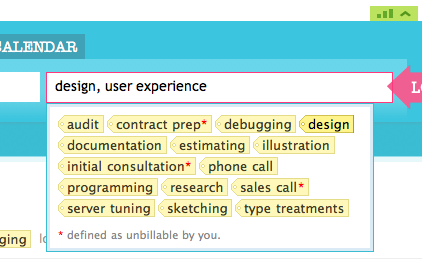
Creating & using unbillable time tags. Tracking unbillable (or non-billable, if you’re like that) time is deadly easy with freckle. Did a potential client call you up on the phone out of the blue? Create an unbillable tag just like a regular new tag, except with an asterisk (*) at the end:
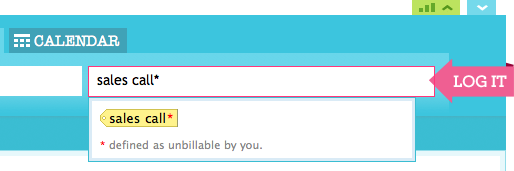
They work just like regular tags in every other way, except that they help you break down where your time really goes.
Using an existing tag. You can either begin to type the tag and hit <tab>, or click its name in the list below the field.
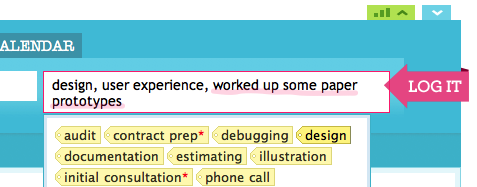
Entering a normal description. You’re not limited to tags (although they are awesomely useful!). You can enter regular descriptions instead of or in addition to tags. There are two ways: the first way is to simply enter more than two words in a row.
For example: design, user experience, worked up some paper prototypes.
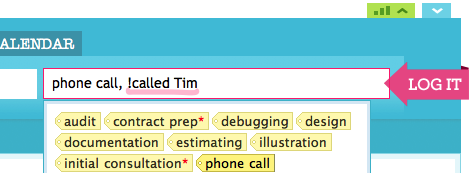
The second way is to place a ! (exclamation point) before your description. You only need to do this if your description is under 2 words (and therefore looks like a tag).

Thomas’ work on Prototype.js, Zepto.js and Micro.js has made him a certified JavaScript Guru. Before founding Freckle, Thomas was consulting with some of the world’s best known companies on their craziest interactive JavaScript needs. A Ruby on Rails core alumni, he is passionate about creating the best user interface experience possible and penned the Scriptaculous JavaScript UI library to share the love, counting sites like Apple.com and Nasa.gov among its users. Thomas’ master plan: work toward a more delicious web using open source goodness.